Arduino is one of the best things that ever happened to electronics beginners. And I say that as someone who has been teaching electronics for over 15 years.
Before Arduino existed, getting started with microcontrollers was genuinely hard. You needed to understand compilers, programmers, and a whole stack of technical setup before you could make anything happen. Now you plug a board into your computer, write a few lines of code, and you’re controlling real-world things within minutes. It’s not an exaggeration to say Arduino changed everything for beginners.
This guide will walk you through what Arduino actually is, what you can build with it, and how to get started — even if you have zero electronics or programming experience.
What is Arduino?
Arduino is a microcontroller board that makes it easy to program electronics. It has several inputs and outputs where you can connect components — LEDs, sensors, motors, displays, and more. You write simple commands on your computer, upload them to the chip on the board via USB, and the board behaves accordingly.
It’s designed to be easy enough for beginners, but it’s so quick to prototype with that professionals use it too.
Here’s a simple example. Say you connect an LED with a resistor between pin 13 and GND on the board:
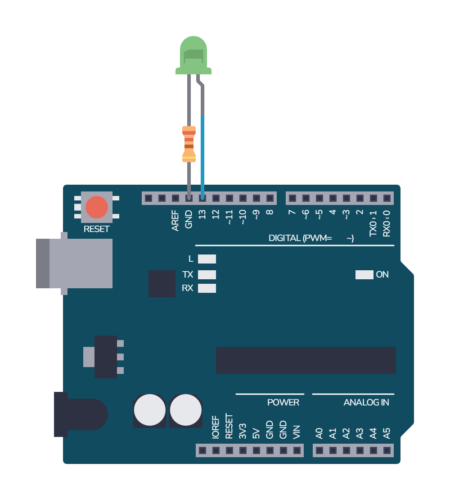
From your code, you can set pin 13 to HIGH (5V) or LOW (0V). HIGH turns the light on, LOW turns it off. That means you can blink a light simply by toggling pin 13 in a loop:
void setup() {
  pinMode(13, OUTPUT); // set pin 13 as an output
}

void loop() {
  digitalWrite(13, HIGH);
  delay(1000); // wait one second
  digitalWrite(13, LOW);
  delay(1000); // wait one second
}
That’s your first Arduino program. It’s not complicated — and that’s exactly the point.
Arduino is by far the most popular board for beginners, but it’s not the only option. If you’re curious about what else is out there, we’ve put together a guide to the most popular Arduino alternatives.
Why Arduino is a great starting point for electronics
The traditional way to build electronics is to wire up components — resistors, capacitors, transistors, logic gates — to make things happen. That works, but it gets complicated fast.
Take a traffic light system. Without a microcontroller, you’d need a timer circuit, logic gates to control the light sequence, and quite a lot of wiring. Possible, but messy.
With Arduino, you connect the LEDs, write a short program to cycle through the lights, and you’re done. It lets you replace components with code.
That’s a fundamental shift in how you build things. And it opens up a huge range of projects that would be impractical to build any other way.
What can you build with Arduino?
More than you’d think. Here are some real examples — not theoretical possibilities, but things beginners actually build:
- A plant watering monitor that checks soil moisture and alerts you when it’s time to water
- A kitchen timer with buttons and a buzzer
- A temperature-controlled fan that turns on when a room gets too warm
- A simple game with an LED display
- A code lock for a door or box
- A Halloween prop that reacts when someone walks past
- Home automation — controlling lights, fans, or appliances automatically
Once you learn the basics, you can find freely available code examples online for almost anything — kitchen scales, cell phones, traffic lights, weather stations. The community around Arduino is enormous, which means you’re rarely starting from scratch.
What do you need to get started?
Not much, and it doesn’t cost a lot.
The Arduino board itself — The Arduino Uno is the standard recommendation for beginners. It’s the most widely used board, which means the most tutorials, examples, and community support are built around it. You can get one for around $25–30.
A USB cable — To connect the board to your computer for uploading code. Usually comes with the board.
Basic components — For your first projects you’ll want some LEDs, resistors, a breadboard, jumper wires, a buzzer, and a few sensors. The good news is you don’t need to buy these individually — a beginner starter kit includes all of this for around $20–30.
A computer — Windows, Mac, or Linux all work. You’ll install the free Arduino IDE software.
That’s it. For under $60 you have everything you need to start building real things.
Do you need programming experience?
No. Arduino uses a simplified version of C++, but you don’t need to know C++ to get started. The Arduino IDE comes with a library of built-in example sketches — ready-made programs that cover everything from blinking an LED to reading sensors — and you’ll understand what the code does even as a complete beginner.
It’s a great way to start experimenting before you’ve written a single line yourself.
The basic structure of an Arduino program has two parts: a setup() function that runs once when the board powers on, and a loop() function that runs continuously. Most beginner projects work within that simple structure.
void setup() {
  // this runs one time on startup
}

void loop() {
  // this runs over and over again in a forever loop
}
You’ll pick up what you need as you go. You don’t need to study programming before touching Arduino.
Do you need electronics knowledge first?
Not really — Arduino is actually a good way to get electronics knowledge. You learn by building real things, which makes the underlying concepts stick much better than reading theory first.
That said, a basic understanding of voltage, current, and how components like LEDs and resistors work will help. You don’t need a deep foundation — just enough to understand why you’re connecting things the way you are.
How long does it take to build your first project?
Your first project — blinking an LED — you can have up and running in a few minutes. That’s not an exaggeration. Install the Arduino IDE, connect the board, upload the example blink sketch, and you’re done.
Something more satisfying, like a plant watering monitor, typically takes an hour or two. By the end of a month of regular practice and learning the basics, most beginners can tackle projects they design themselves.
The learning curve is genuinely not steep. The bigger factor is how structured your learning is. People who follow a step-by-step path make much faster progress than people who jump between random YouTube videos and tutorials. More on that below.
What’s the best way to learn Arduino?
There’s no shortage of free Arduino content online — tutorials, YouTube channels, forum posts, and example code. If you’re patient and self-directed, you can piece together a lot for free.
The problem is that free content is fragmented. A YouTube video shows you one thing, a forum post shows you something else, and you end up with gaps in your knowledge that cause frustrating problems later. You don’t know what you don’t know.
A structured course solves that problem. You follow a clear path from the basics to more complex projects, building on each step deliberately. You finish with a solid foundation rather than a patchwork of half-understood concepts.
The other thing that makes a big difference is having somewhere to ask questions when you get stuck. And you will get stuck — everyone does. Having a community and an instructor to help you through those moments is the difference between pushing through and giving up.
Ready to start learning Arduino?
The Learn Arduino learning track at Ohmify takes you from zero to confidently building your own Arduino projects in about 4 weeks — with around 4 hours per week. It’s structured, hands-on, and built around real projects, not just theory.
The learning track is part of the Ohmify membership — along with 80+ other courses, projects, and a community of makers to help you when you get stuck.
You don’t need any prior electronics or programming experience.
Want to learn more before you commit? Browse the rest of our free guides.